
PAGE 2
Okies~
Now go to SELECTIONS, hit INVERT this time and the outside of your LAST
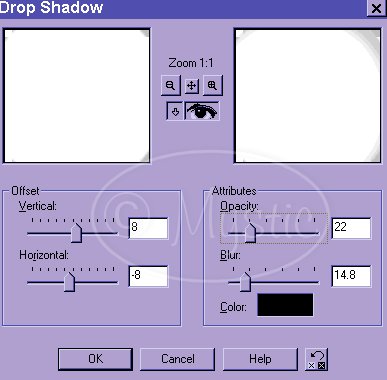
(top layer) circle should now be automatically selected. Lets add a drop shadow, with the following settings:
Add a second Drop Shadow, with the settings inverted, meaning, where there is a -8, now use 8 and viceversa, leave blur and opacity the same., an
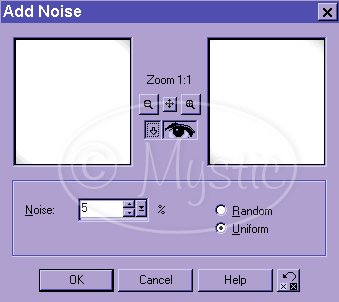
Next add some noise, with these settings:
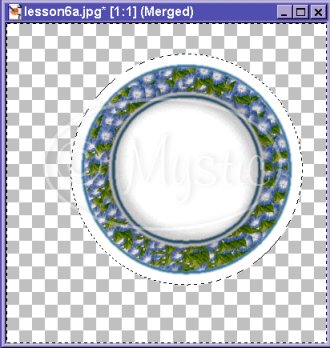
Merge visible layers, with the magic wand touch anywhere outside the clock,
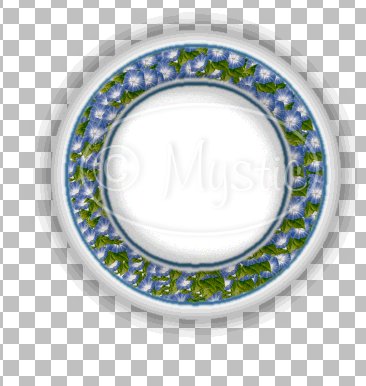
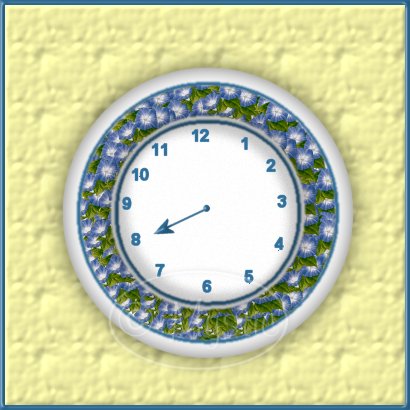
You *should* end up wiht something that looks like this:
Almost done! Add a drop shadow with these settings:
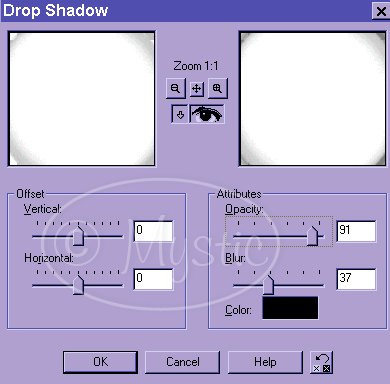
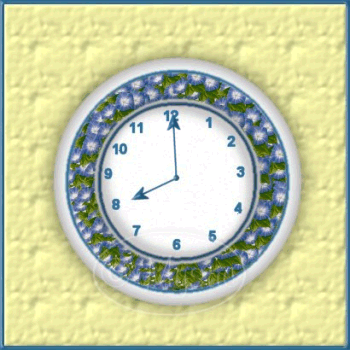
Go to SELECTIONS, INVERT and add another drop shadow with the same settings, and VOILA!~~You should have something liek this:
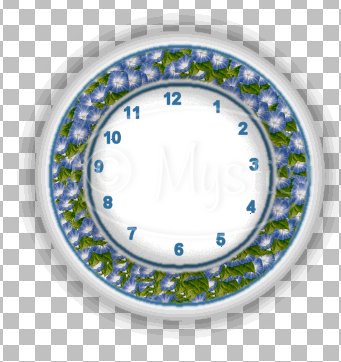
*BUT* this is a clock, so lets' add some numbers!!~~
Choose the matching color again (mine as blue remember??lol) and pick your *DRAWing* tool  and set it to *1*. Make even spaced *dots* (You all know I love dots now dont' you???..lol)..these dots will help you place your
clock's numbers, like this:
and set it to *1*. Make even spaced *dots* (You all know I love dots now dont' you???..lol)..these dots will help you place your
clock's numbers, like this:
Next, choose your writing tool, pick your font, use size 12-14 depending on what looks right to you., now make sure you have cheked *USE PRECISE CURSOR*
and on each DOT write the corresponding number, like this:
Now ADD a new layer and name it yes *Middle dot* lol,
and with the preshapes tool and the matching color selected,
draw a small circle, and give it a bevel, whatever looks right to you, to make it into a nice little button, for our clock hands.
(I had a little psp crash at this point lol and forgot to save the screen shot for that, but just *wing it* lol. and save your work!!)
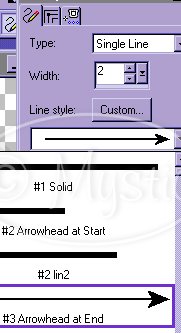
Next choose your DRAWING TOOL AGAIN, but this time look for the *Arrowead at start* line, with these settings:
ADD A NEW LAYER, but move it under your *middle dot* layer, and draw your clocks, small hand, from the middle out to the #8, after all...we're making my daughter's clock
and her bedtime is 9 :), lol not really you can make it whatever time you want,
and the arrows, well if you would like to get creative, make them squiggly, or
chunky, whatever you want :), add the same bevel as the button, and hopefully you'll have something similar to this:
OK NOW...notice the background changed? This is where you add
whatever you want to your clock. Add your copyright too. Once you have it the
way you want it to look, MERGE ALL layers and save it, where you can find it.
You are now ready to animate.
I have done this two ways, one that shows you how to set up a new animation in animation shop, for those who are not so experienced with this,
CLICK HERE to go there, and another link that'll skip over that and go straight to the animating of the clock, CLICK HERE
for Continue, on to page 3

:::HOME:::: ::::EMAIL::::

Graphics, Background and Content;
© 1999-2000, 2001-2011 by
Mystic
Permission for posting and usage has been given to PSP Workbench.
DISCLAIMER:
I know there are many people out there who have
writtem similar Tutorials, however, all my Tutorials have been written BY ME
using my own tehniques.
It is my goal to use as many PSP tools as possible so that you will learn to use PSP and make something nice along the way.
Some things I have learned from other people, when applicable I will add a link to such sites.
*THANKS* in advance for not sending hate mail.
ALL RIGHTS RESERVED
That means I'm keeping all my work to myself.
~*~If you have joined me from a webring..*THANKS* for dropping in!~*~
|
|